Next.js Setup
Set up Lumen with Next.js App Router: connect Stripe, install packages, and implement billing.
1. Connect Stripe & Create Lumen Account
-
Stripe Keys: Get your test mode Secret and Publishable keys from Stripe Dashboard.
Using Dodo Payments?
Dodo Payments works similarly to Stripe but uses a single API Key (Secret Key) instead of two.
Just like Stripe, Dodo has Test Mode and Live Mode keys. Make sure to use your Test Key for this guide.
-
Lumen Account: Sign up at getlumen.dev.
Tip
We recommend creating two separate Lumen accounts (e.g. yourname+test@gmail.com and yourname@gmail.com) to keep test and live data completely separate. Alternatively, you can swap your test keys for live keys later.
- Onboarding: Enter your Stripe test keys and select USD as the currency.
2. Install Packages
Install the SDKs and shadcn UI components:
npm install @getlumen/server @getlumen/react
npx shadcn@latest add https://getlumen.dev/pricing-table.json
npx shadcn@latest add https://getlumen.dev/usage-badge.json
3. Environment Variables
During onboarding, you should have gotten Lumen API keys. Add them to your .env file.
# you can get new keys at https://getlumen.dev/developer/apikeys if you lost them
LUMEN_API_KEY=sk_live_...                    # Backend
NEXT_PUBLIC_LUMEN_PUBLISHABLE_KEY=pk_live_... # Frontend
4. Lumen Handler
Create a handler route to securely proxy Lumen requests (Your Frontend → Your Backend → Lumen).
Important
Make sure to update the code to use your auth provider and get the user id from the request.
app/api/lumen/[...all]/route.ts:
import { NextRequest, NextResponse } from "next/server";
import { auth } from "@clerk/nextjs/server"; // or your auth provider
import { lumenNextHandler } from "@getlumen/server";

const handler = async (request: NextRequest) => {
  const { userId } = await auth();
  if (!userId) return NextResponse.json({ error: "Unauthorized" }, { status: 401 });

  return NextResponse.json(await lumenNextHandler({ request, userId }));
};

export { handler as GET, handler as POST, handler as PUT, handler as DELETE, handler as PATCH, handler as OPTIONS, handler as HEAD };
5. Setup LumenProvider
To use Lumen's hooks and components, you need to wrap your application with the LumenProvider.
First, create a client-side providers component:
// app/providers.tsx
"use client";
import { LumenProvider } from "@getlumen/react";

export function Providers({ children }: { children: React.ReactNode }) {
  return (
    <LumenProvider config={{ apiProxyUrl: "/api/lumen" }}>
      {children}
    </LumenProvider>
  );
}
Then, wrap your root layout with this component:
// app/layout.tsx
import { Providers } from "./providers";

export default function RootLayout({ children }) {
  return (
    <html>
      <body>
        <Providers>{children}</Providers>
      </body>
    </html>
  );
}
6. Webhooks (Recommended)
Lumen works best if every user has a subscription, even if it's just a free plan. This ensures that:
- Entitlements work immediately: You can check feature access for all users.
- Smooth Upgrades: Users can upgrade from Free → Pro without data migration issues.
To achieve this, we listen to user.created events from your auth provider to automatically create a free customer in Lumen.
-
Go to Configure > Webhooks in Clerk and create a webhook for
user.created. -
URL:
https://api.getlumen.dev/v1/webhooks/clerk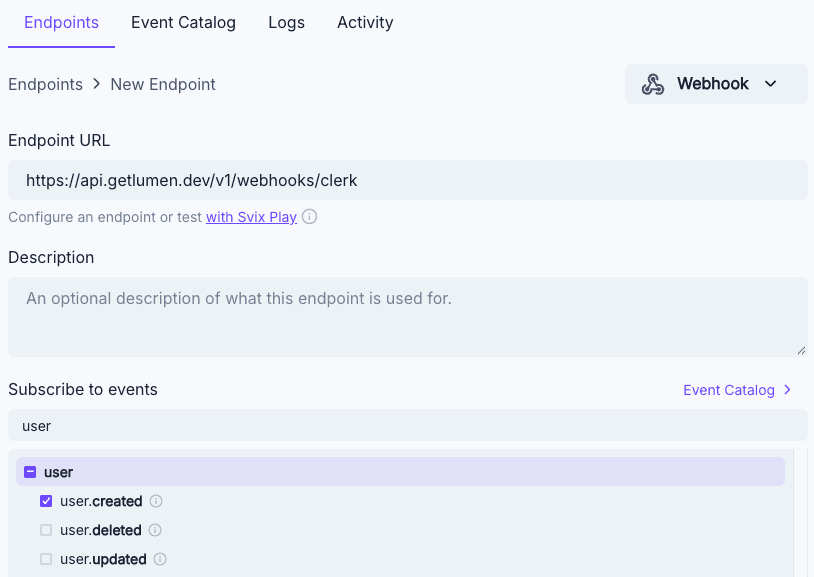
-
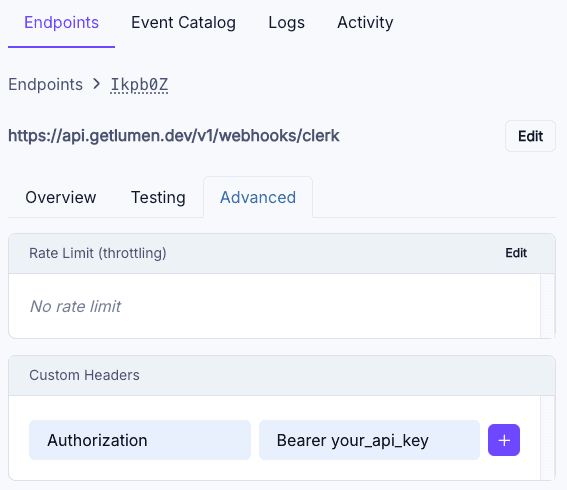
In the Advanced tab, add this header:
- Key:
Authorization - Value:
Bearer your_lumen_secret_key(from API Keys)
- Key:
-
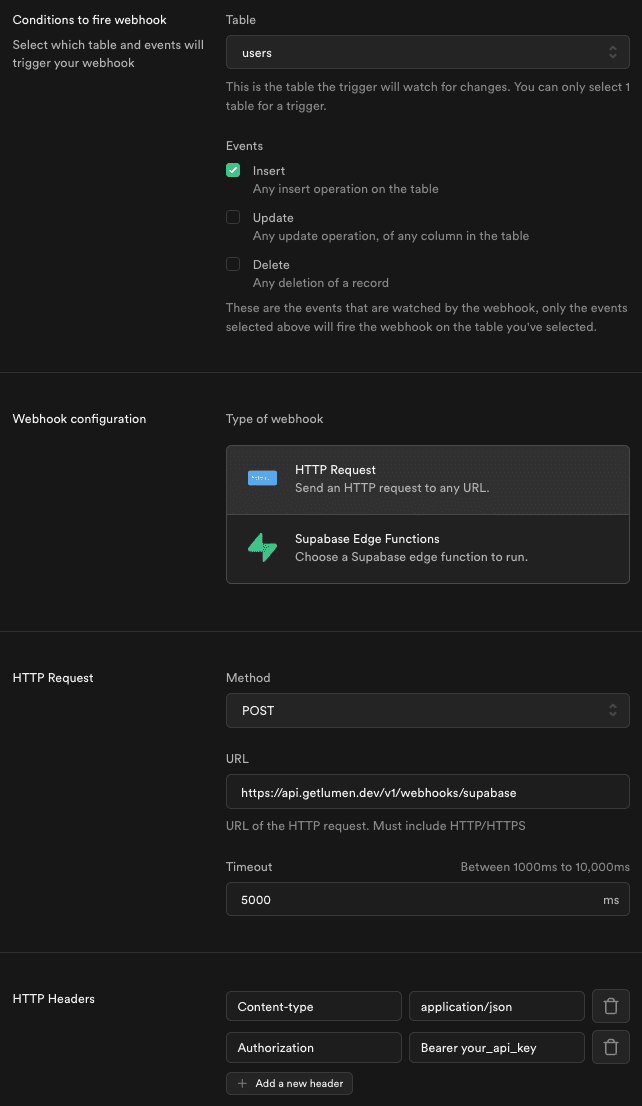
Go to Webhooks > Create a new hook.
-
Trigger on INSERT in
auth.users. -
URL:
https://api.getlumen.dev/v1/webhooks/supabase -
Add this HTTP Header:
Authorization: Bearer your_lumen_secret_key
Install and configure the Lumen plugin:
npm install @getlumen/better-authimport { LumenPlugin } from "@getlumen/better-auth";
export const auth = betterAuth({
plugins: [ LumenPlugin({ apiKey: process.env.LUMEN_API_KEY! }) ],
});7. Create a Plan
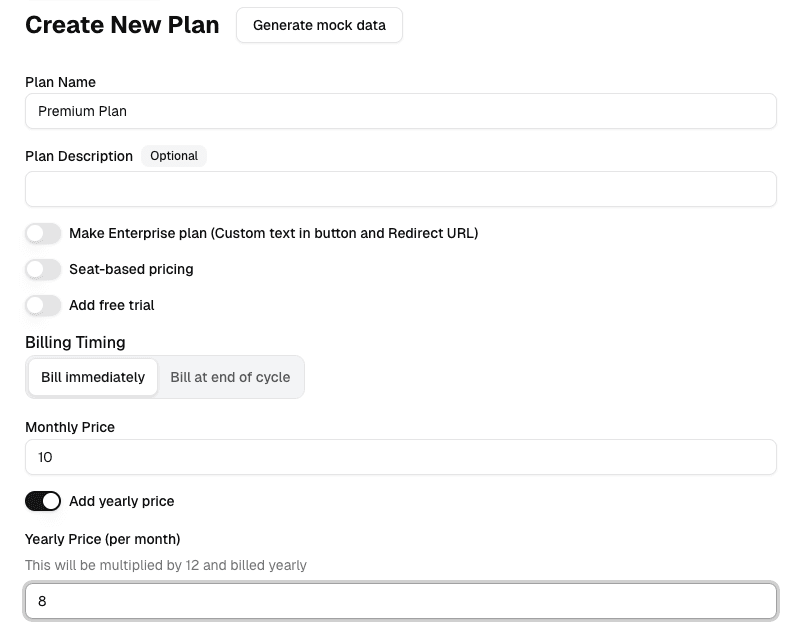
In the Lumen Dashboard, go to Plans → Create. Let's create a test plan:
- Basic Info: Name it "Premium Plan".
- Pricing: Set Monthly Price to $10. Toggle on yearly price and set it to *$8 ($8 * 12 = $96 for the year).
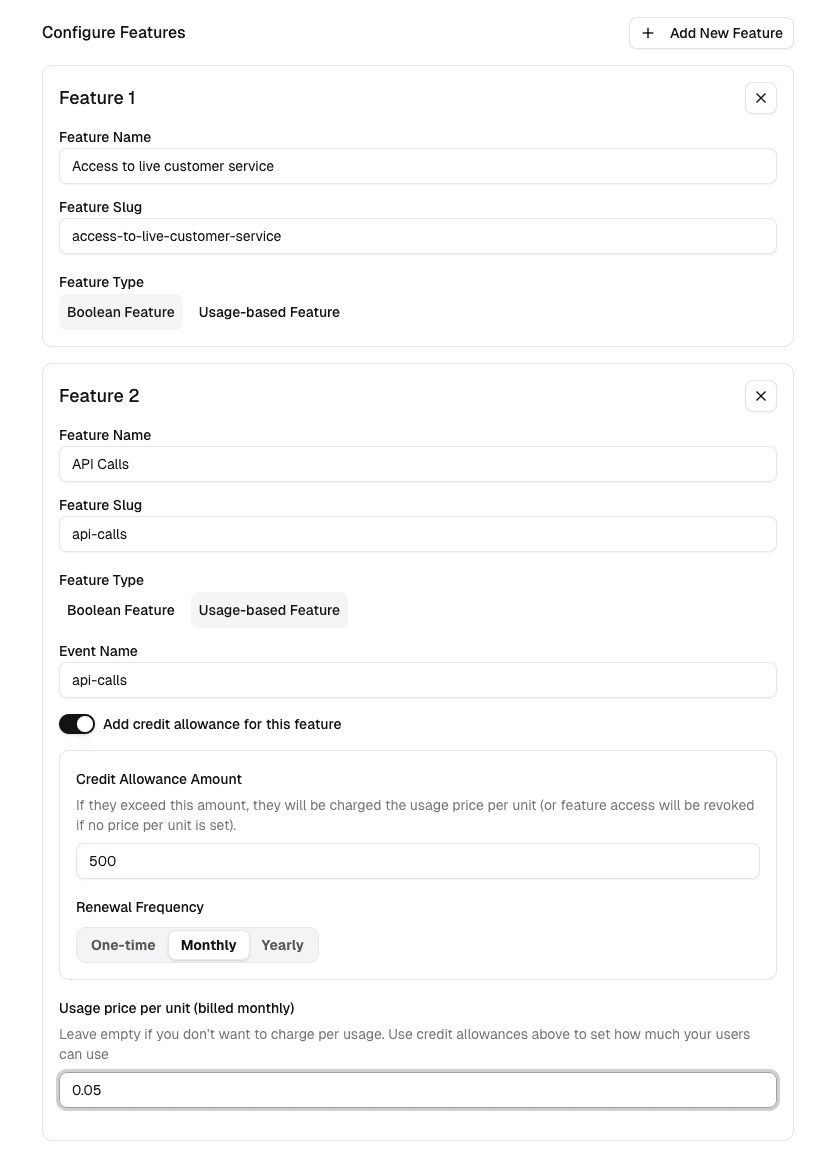
- Features: Click
Add New Featureto add entitlements:- Boolean Feature: Name it "Access to live customer service".
- Usage Feature: Name it "API Calls". Enable credit allowance of 500 (Monthly renewal) and set overage price to $0.05.
See screenshots of plan configuration
8. Add Pricing Table
Create a pricing page (e.g., app/pricing/page.tsx) and drop in the PricingTable. This component handles the full checkout flow automatically.
Important
Make sure to update the code to use your auth provider and get the user id from the request.
import { PricingTable } from "@/components/ui/pricing-table";
import { auth } from "@clerk/nextjs/server";

export default async function PricingPage() {
  const { userId } = await auth();
  // Handles plan selection and redirects to Stripe Checkout
  return <PricingTable
    lumenPublishableKey={process.env.NEXT_PUBLIC_LUMEN_PUBLISHABLE_KEY}
    userId={userId}
    loginRedirectUrl="/login"
  />;
}
9. Entitlements: Frontend vs Backend
Lumen allows you to check feature access in two places. It's important to understand where and why to use each.
| Context | Purpose | Security |
|---|---|---|
| Frontend | UX/UI: Hide buttons, show upgrade prompts, display usage bars. | Not secure (users can bypass with DevTools). |
| Backend | Enforcement: Prevent API access, block database writes, track reliable usage. | Secure. This is the source of truth. |
Note: You rarely need to check "Does user have a subscription?". Instead, check "Does user have Feature X?". This decouples your code from plan names (e.g., moving "Analytics" from Pro to Enterprise won't break your code).
1. Frontend (UX)
Use these to improve user experience. You can choose between pre-built components (easier) or hooks (more control). They don't replace backend checks.
Hide/Gate Content
Show content only if the user has the feature.
import { useFeature } from "@getlumen/react";

const { entitled } = useFeature(userId, "access-to-live-customer-service");

if (!entitled) return null;

return <LiveChatWidget />;
import { FeatureGate, Paywall } from "@getlumen/react";
// Simple: Render null if not entitled
<FeatureGate
userId={userId}
feature="access-to-live-customer-service"
>
<LiveChatWidget />
</FeatureGate>
// Upgrade Prompt: Show a paywall if not entitled
<Paywall
userId={userId}
feature="access-to-live-customer-service"
onUpgrade={() => router.push('/pricing')}
>
<LiveChatWidget />
</Paywall>Show Usage
Display usage limits to users.
import { useUsageQuota } from "@getlumen/react";

const { used, limit, percentage } = useUsageQuota(userId, "api-calls");
// Built-in simple display
<UsageDisplay
userId={userId}
feature="api-calls"
showProgressBar
/>
// shadcn component (customizable)
<UsageBadge
featureSlug="api-calls"
label="API Calls"
/>2. Backend (Security)
This is where you enforce limits. Always check entitlements here before performing sensitive actions.
import { sendEvent, isFeatureEntitled } from "@getlumen/server";

export async function POST(req: NextRequest) {
  const { userId } = await auth();

  // 1. SECURITY CHECK: Does the user have the feature?
  // This checks the plan, subscription status, and remaining credits.
  if (!await isFeatureEntitled({ feature: "api-calls", userId })) {
    return NextResponse.json({ error: "Upgrade required" }, { status: 403 });
  }

  // 2. Execute Business Logic
  const result = await doExpensiveWork();

  // 3. Track Usage (if applicable)
  await sendEvent({ name: "api-calls", userId });

  return NextResponse.json({ success: true, result });
}
10. Test Checkout
Run your app locally and navigate to your pricing page. Use these test cards to complete a purchase:
- Card:
4242 4242 4242 4242 - Expiry: Any future date (e.g. 12/34)
- CVC: Any 3 digits (e.g. 123)
After checkout, verify the subscription:
- Lumen Dashboard: Subscriptions page
- Stripe Dashboard: Stripe Payments (Test Mode)
- Card:
4242 4242 4242 4242 - Expiry:
06/32(must use this specific date) - CVC:
123(must use this specific code)
After checkout, verify the subscription:
- Lumen Dashboard: Subscriptions page
- Dodo Dashboard: Dodo Payments Dashboard
Going to Production
You are currently using Test Mode keys. When you are ready to launch:
- Create a new Lumen Account (or use a separate team/workspace if available) to keep production data clean.
- Get your Live Mode keys from Stripe.
- Update your environment variables with the new Live keys.
Done!
Lumen billing is now fully integrated. You can test upgrades, downgrades, and cancellations.