React + Node Setup
Set up Lumen with a React frontend and Express/Hono backend: connect Stripe, install packages, and implement billing.
1. Connect Stripe & Create Lumen Account
-
Stripe Keys: Get your test mode Secret and Publishable keys from Stripe Dashboard.
Using Dodo Payments?
Dodo Payments works similarly to Stripe but uses a single API Key (Secret Key) instead of two.
Just like Stripe, Dodo has Test Mode and Live Mode keys. Make sure to use your Test Key for this guide.
-
Lumen Account: Sign up at getlumen.dev.
Tip
We recommend creating two separate Lumen accounts (e.g. yourname+test@gmail.com and yourname@gmail.com) to keep test and live data completely separate. Alternatively, you can swap your test keys for live keys later.
- Onboarding: Enter your Stripe test keys and select USD as the currency.
2. Install Packages
Backend (Express/Hono):
npm install @getlumen/serverFrontend (React):
First, install the React SDK:
npm install @getlumen/reactThen, install the UI components. Choose the method that works for your setup:
Recommended method - Uses shadcn CLI to install components
npx shadcn@latest add https://getlumen.dev/pricing-table.json
npx shadcn@latest add https://getlumen.dev/usage-badge.json
This method works even if you don't have shadcn/ui set up in your project. The shadcn CLI will:
- Download the PricingTable and UsageBadge components
- Automatically configure your
components.jsonif it doesn't exist - Set up the necessary file structure
Requirements
Requires React and Tailwind CSS installed in your project.
Alternative method - Direct component installation
npx lumen addThis interactive command will:
- Download the PricingTable component (TypeScript or JavaScript)
- Configure Tailwind CSS automatically
- Add required CSS variables
For non-interactive installation:
# TypeScript
npx lumen add -l tsx -p src/components/pricing-table.tsx -y

# JavaScript
npx lumen add -l jsx -p src/components/pricing-table.jsx -y
Requirements
This method requires Tailwind CSS installed in your project.
3. Environment Variables
During onboarding, you should have gotten Lumen API keys.
Backend (.env):
# you can get new keys at https://getlumen.dev/developer/apikeys if you lost them
LUMEN_API_KEY=sk_live_...
Frontend (.env):
VITE_LUMEN_PUBLISHABLE_KEY=pk_live_...Vite exposes env vars prefixed with VITE_ via import.meta.env.
REACT_APP_LUMEN_PUBLISHABLE_KEY=pk_live_...Create React App exposes env vars prefixed with REACT_APP_ via process.env.
LUMEN_PUBLISHABLE_KEY=pk_live_...Check your bundler's documentation for how to expose environment variables to the browser. Common patterns:
- Webpack: Use
DefinePluginordotenv-webpack - Parcel: All env vars are available via
process.env - esbuild: Use
--defineflag
⚠️ Important: Only expose the publishable key (starts with pk_) to the frontend. Never expose the secret key (sk_).
Using Next.js?
Check out our dedicated Next.js Setup Guide for an optimized Next.js experience.
4. Lumen Handler (Backend)
Create a handler route to securely proxy Lumen requests (Frontend → Backend → Lumen).
Important
Make sure to update the code to use your auth middleware and get the user id from the request.
import express from 'express';
import { lumenExpressHandler } from '@getlumen/server';

const app = express();
app.use(express.json());

// Your auth middleware
const requireAuth = (req, res, next) => {
  // Example: Extract from JWT or session
  const userId = req.user?.id;
  if (!userId) return res.status(401).json({ error: "Unauthorized" });
  next();
};

// Lumen proxy route
app.all('/api/lumen/*', requireAuth, lumenExpressHandler({
  getUserId: (req) => req.user.id,
  mountPath: '/api/lumen',
}));

app.listen(3000, () => console.log('Server running on port 3000'));
import { Hono } from 'hono';
import { lumenHonoHandler } from '@getlumen/server';
const app = new Hono();
// Your auth middleware
const requireAuth = async (c, next) => {
// Example: Extract from JWT or session
const userId = c.get('userId');
if (!userId) return c.json({ error: "Unauthorized" }, 401);
await next();
};
// Lumen proxy route
app.all('/api/lumen/*', requireAuth, lumenHonoHandler({
getUserId: (c) => c.get('userId'),
mountPath: '/api/lumen',
}));
export default app;5. Setup LumenProvider (Frontend)
To use Lumen's hooks and components, wrap your React app with the LumenProvider.
// src/main.tsx or src/App.tsx
import { LumenProvider } from "@getlumen/react";

function App() {
  return (
    <LumenProvider config={{ apiProxyUrl: "http://localhost:3000/api/lumen" }}>
      {/* Your app components */}
    </LumenProvider>
  );
}

export default App;
// src/index.tsx or src/App.tsx
import { LumenProvider } from "@getlumen/react";
function App() {
return (
<LumenProvider config={{ apiProxyUrl: "http://localhost:3000/api/lumen" }}>
{/* Your app components */}
</LumenProvider>
);
}
export default App;Production
In production, replace http://localhost:3000 with your actual backend URL. You can also use environment variables for this:
apiProxyUrl: import.meta.env.VITE_API_URL + "/api/lumen"
// or
apiProxyUrl: process.env.REACT_APP_API_URL + "/api/lumen"
6. Webhooks (Recommended)
Lumen works best if every user has a subscription, even if it's just a free plan. This ensures that:
- Entitlements work immediately: You can check feature access for all users.
- Smooth Upgrades: Users can upgrade from Free → Pro without data migration issues.
To achieve this, we listen to user.created events from your auth provider to automatically create a free customer in Lumen.
-
Go to Configure > Webhooks in Clerk and create a webhook for
user.created. -
URL:
https://api.getlumen.dev/v1/webhooks/clerk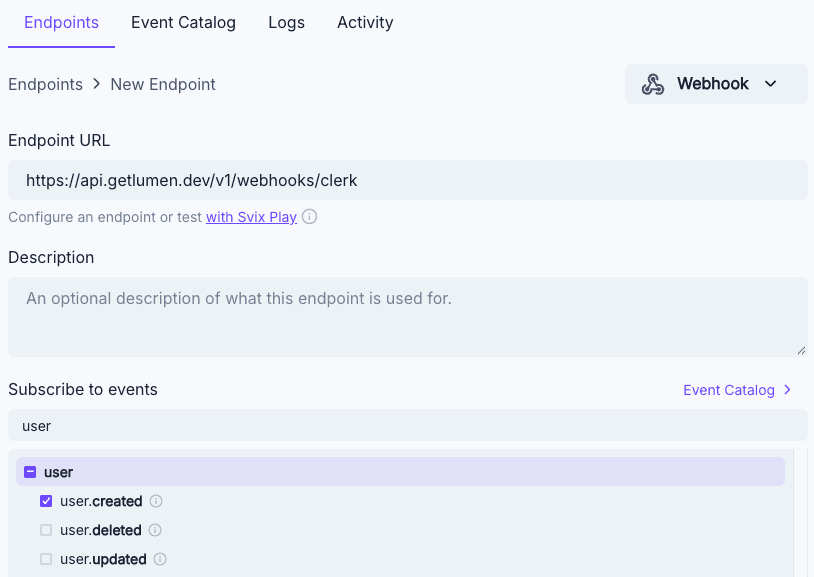
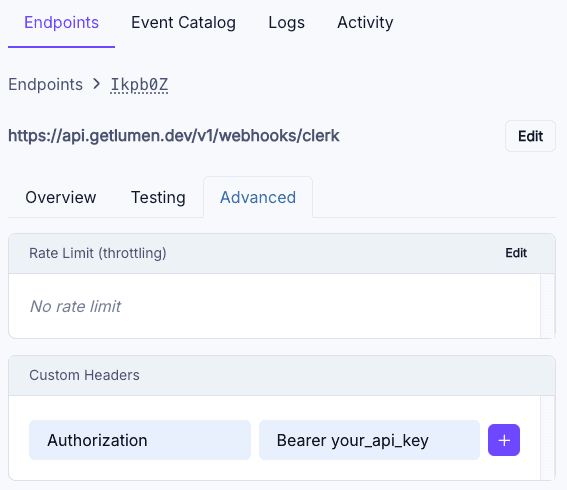
-
In the Advanced tab, add this header:
- Key:
Authorization - Value:
Bearer your_lumen_secret_key(from API Keys)
- Key:
-
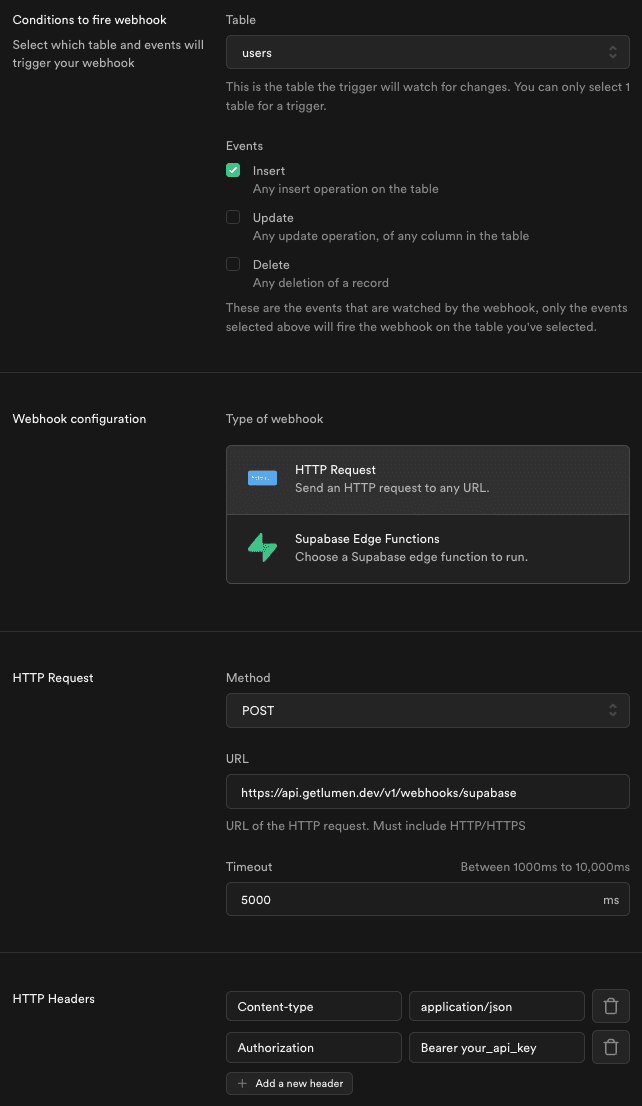
Go to Webhooks > Create a new hook.
-
Trigger on INSERT in
auth.users. -
URL:
https://api.getlumen.dev/v1/webhooks/supabase -
Add this HTTP Header:
Authorization: Bearer your_lumen_secret_key
Install and configure the Lumen plugin:
npm install @getlumen/better-authimport { LumenPlugin } from "@getlumen/better-auth";
export const auth = betterAuth({
plugins: [ LumenPlugin({ apiKey: process.env.LUMEN_API_KEY! }) ],
});The plugin automatically enrolls new users in Lumen when they sign up.
For any other auth system, call enrollUser in your signup endpoint after creating the user in your database:
import { enrollUser } from '@getlumen/server';

// In your signup route
app.post('/api/auth/signup', async (req, res) => {
  const { email, name, password } = req.body;

  // 1. Create user in your auth system/database
  const user = await createUser({ email, name, password });

  // 2. Enroll user in Lumen (creates free customer with subscription)
  await enrollUser({
    email: user.email,
    name: user.name,
    userId: user.id,  // Must match the ID from your auth system
  });

  res.json({ success: true, userId: user.id });
});
import { enrollUser } from '@getlumen/server';
// In your signup route
app.post('/api/auth/signup', async (c) => {
const { email, name, password } = await c.req.json();
// 1. Create user in your auth system/database
const user = await createUser({ email, name, password });
// 2. Enroll user in Lumen (creates free customer with subscription)
await enrollUser({
email: user.email,
name: user.name,
userId: user.id, // Must match the ID from your auth system
});
return c.json({ success: true, userId: user.id });
});Important: The userId passed to Lumen must match the user ID from your authentication system, as this is how Lumen links subscriptions to users.
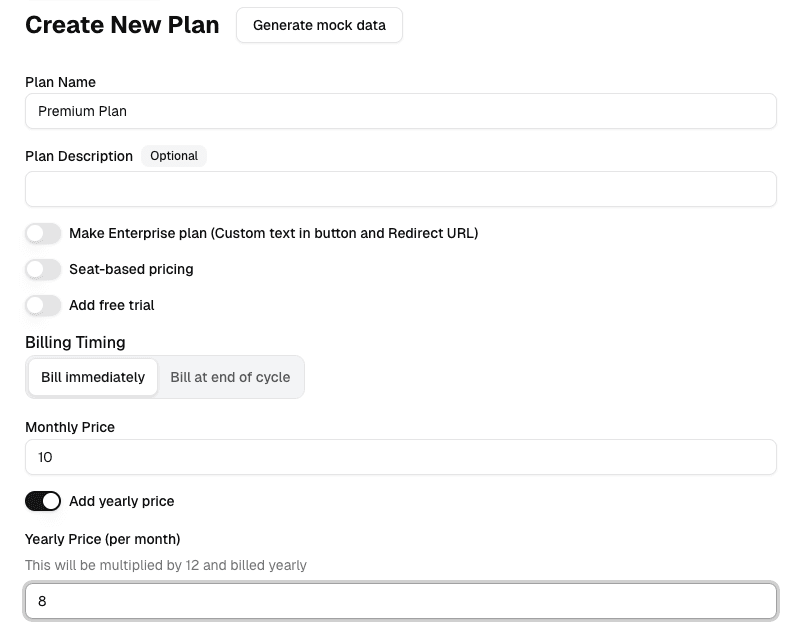
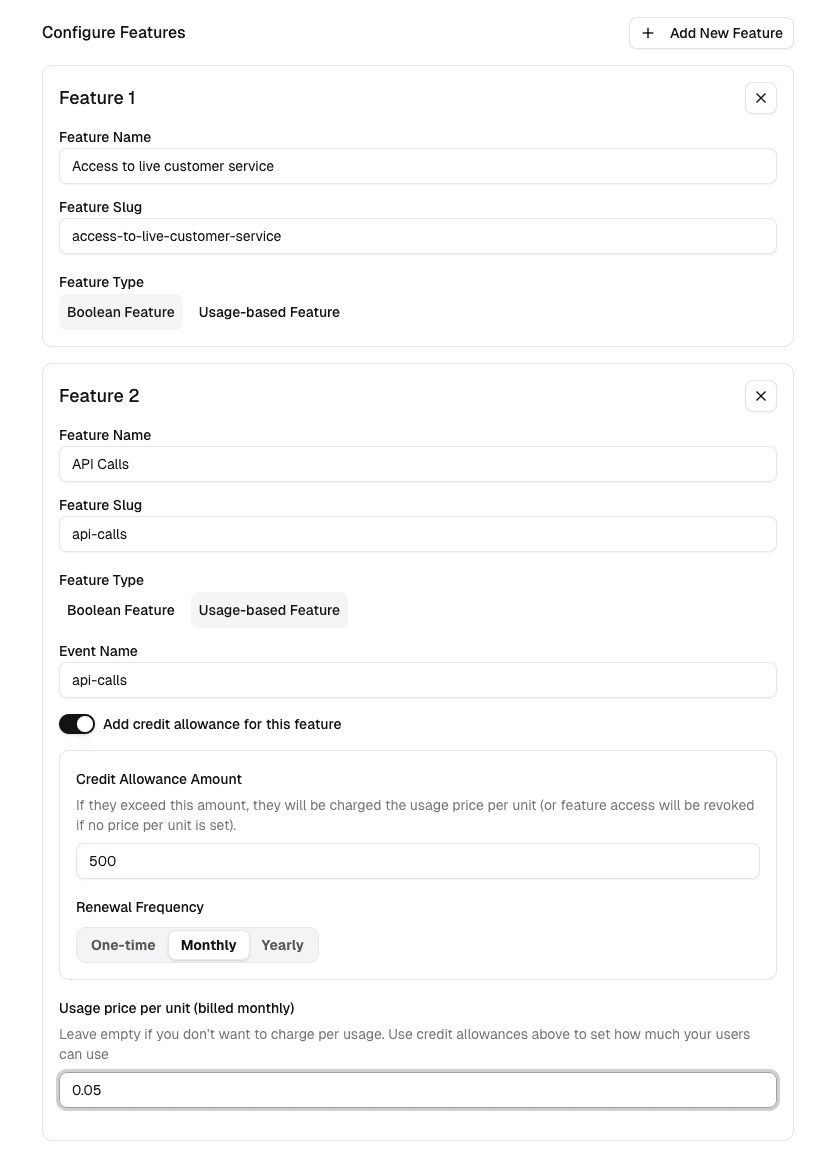
7. Create a Plan
In the Lumen Dashboard, go to Plans → Create. Let's create a test plan:
- Basic Info: Name it "Premium Plan".
- Pricing: Set Monthly Price to $10. Toggle on yearly price and set it to *$8 ($8 * 12 = $96 for the year).
- Features: Click
Add New Featureto add entitlements:- Boolean Feature: Name it "Access to live customer service".
- Usage Feature: Name it "API Calls". Enable credit allowance of 500 (Monthly renewal) and set overage price to $0.05.
See screenshots of plan configuration
8. Add Pricing Table (Frontend)
Create a pricing page and drop in the PricingTable component. This component handles the full checkout flow automatically.
Import path depends on your installation method:
- Lumen CLI: Import from the path where you installed it (e.g.,
./components/pricing-table) - shadcn: Import from
@/components/ui/pricing-table
// src/pages/Pricing.tsx
import { PricingTable } from "./components/pricing-table"; // or "@/components/ui/pricing-table" if using shadcn
import { useAuth } from "./your-auth-provider"; // Your auth hook

export default function PricingPage() {
  const { userId } = useAuth();

  return (
    <PricingTable
      lumenPublishableKey={import.meta.env.VITE_LUMEN_PUBLISHABLE_KEY}
      userId={userId}
      loginRedirectUrl="/login"
    />
  );
}
// src/pages/Pricing.tsx
import { PricingTable } from "./components/pricing-table"; // or "@/components/ui/pricing-table" if using shadcn
import { useAuth } from "./your-auth-provider"; // Your auth hook
export default function PricingPage() {
const { userId } = useAuth();
return (
<PricingTable
lumenPublishableKey={process.env.REACT_APP_LUMEN_PUBLISHABLE_KEY}
userId={userId}
loginRedirectUrl="/login"
/>
);
}// src/pages/Pricing.tsx
import { PricingTable } from "./components/pricing-table"; // or "@/components/ui/pricing-table" if using shadcn
import { useAuth } from "./your-auth-provider"; // Your auth hook
export default function PricingPage() {
const { userId } = useAuth();
return (
<PricingTable
lumenPublishableKey={process.env.LUMEN_PUBLISHABLE_KEY} // Adjust based on your bundler
userId={userId}
loginRedirectUrl="/login"
/>
);
}Use the environment variable name you set up in Step 3, and access it based on your bundler's pattern.
9. Entitlements: Frontend vs Backend
Lumen allows you to check feature access in two places. It's important to understand where and why to use each.
| Context | Purpose | Security |
|---|---|---|
| Frontend | UX/UI: Hide buttons, show upgrade prompts, display usage bars. | Not secure (users can bypass with DevTools). |
| Backend | Enforcement: Prevent API access, block database writes, track reliable usage. | Secure. This is the source of truth. |
Note: You rarely need to check "Does user have a subscription?". Instead, check "Does user have Feature X?". This decouples your code from plan names.
Frontend (UX)
Use these to improve user experience. They don't replace backend checks.
Hide/Gate Content
import { useFeature } from "@getlumen/react";

const { entitled } = useFeature(userId, "access-to-live-customer-service");

if (!entitled) return null;

return <LiveChatWidget />;
import { FeatureGate, Paywall } from "@getlumen/react";
// Simple: Render null if not entitled
<FeatureGate
userId={userId}
feature="access-to-live-customer-service"
>
<LiveChatWidget />
</FeatureGate>
// Upgrade Prompt: Show a paywall if not entitled
<Paywall
userId={userId}
feature="access-to-live-customer-service"
onUpgrade={() => navigate('/pricing')}
>
<LiveChatWidget />
</Paywall>Show Usage
import { useUsageQuota } from "@getlumen/react";

const { used, limit, percentage } = useUsageQuota(userId, "api-calls");<UsageBadge
featureSlug="api-calls"
label="API Calls"
/>Backend (Security)
This is where you enforce limits. Always check entitlements here before performing sensitive actions.
import { sendEvent, isFeatureEntitled } from "@getlumen/server";

app.post('/api/expensive-operation', requireAuth, async (req, res) => {
  const userId = req.user.id;

  // 1. SECURITY CHECK: Does the user have the feature?
  if (!await isFeatureEntitled({ feature: "api-calls", userId })) {
    return res.status(403).json({ error: "Upgrade required" });
  }

  // 2. Execute Business Logic
  const result = await doExpensiveWork();

  // 3. Track Usage
  await sendEvent({ name: "api-calls", userId });

  res.json({ success: true, result });
});
import { sendEvent, isFeatureEntitled } from "@getlumen/server";
app.post('/api/expensive-operation', requireAuth, async (c) => {
const userId = c.get('userId');
// 1. SECURITY CHECK: Does the user have the feature?
if (!await isFeatureEntitled({ feature: "api-calls", userId })) {
return c.json({ error: "Upgrade required" }, 403);
}
// 2. Execute Business Logic
const result = await doExpensiveWork();
// 3. Track Usage
await sendEvent({ name: "api-calls", userId });
return c.json({ success: true, result });
});10. Test Checkout
Run both your frontend and backend, then navigate to your pricing page. Use these test cards to complete a purchase:
- Card:
4242 4242 4242 4242 - Expiry: Any future date (e.g. 12/34)
- CVC: Any 3 digits (e.g. 123)
After checkout, verify the subscription:
- Lumen Dashboard: Subscriptions page
- Stripe Dashboard: Stripe Payments (Test Mode)
- Card:
4242 4242 4242 4242 - Expiry:
06/32(must use this specific date) - CVC:
123(must use this specific code)
After checkout, verify the subscription:
- Lumen Dashboard: Subscriptions page
- Dodo Dashboard: Dodo Payments Dashboard
Going to Production
You are currently using Test Mode keys. When you are ready to launch:
- Create a new Lumen Account (or use a separate team/workspace if available) to keep production data clean.
- Get your Live Mode keys from Stripe.
- Update your environment variables with the new Live keys.
Done!
Lumen billing is now fully integrated. You can test upgrades, downgrades, and cancellations.